ui-test
Compare original and translation side by side
🇺🇸
Original
English🇨🇳
Translation
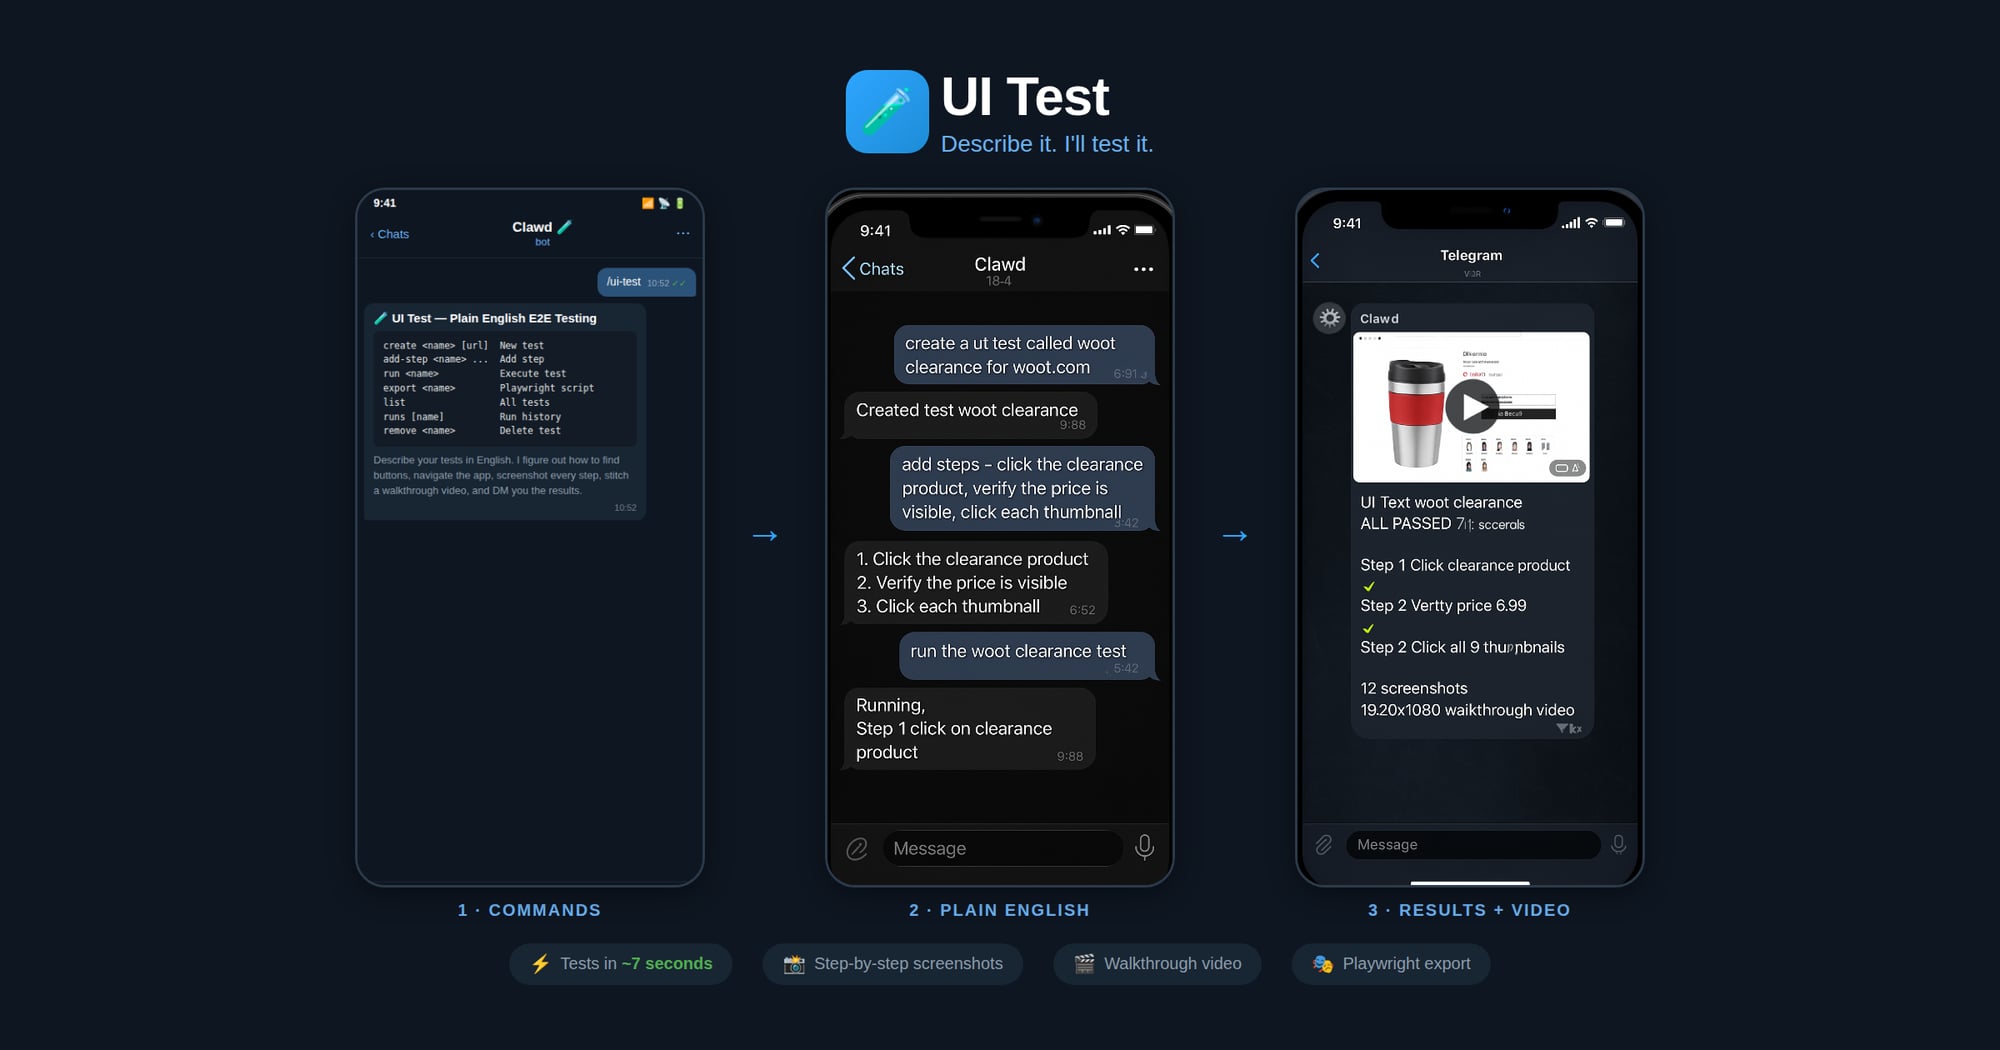
ChineseUI Test — Plain English E2E Testing (🧪)
UI测试——基于自然语言的端到端测试(🧪)
Describe your UI tests in plain English. The agent figures out how to find buttons, navigate the app flow, and execute each step — no selectors or code needed. It screenshots every major step, stitches them into a walkthrough video, and DMs you the result with a pass/fail report.
Made in 🤠 Texas ❤️ PlebLab
用通俗易懂的自然语言描述你的UI测试步骤。Agent会自动定位按钮、梳理应用流程并执行每一步——无需选择器或代码。它会在每个关键步骤截图,将截图拼接成演示视频,并通过私信向你发送包含通过/失败结果的测试报告。
由🤠德克萨斯州的PlebLab出品 ❤️ PlebLab
Workflow
工作流程
- Create — User names a test and describes steps in plain English
- Run — Agent opens the clawd browser, executes each step, screenshots each action
- Export — Agent generates a Playwright from the verified steps
.spec.ts - CI/CD — User drops the script into their test suite, runs with
npx playwright test
- 创建——用户为测试命名并用自然语言描述步骤
- 运行——Agent启动clawd浏览器,执行每一步操作并为每个动作截图
- 导出——Agent根据已验证的步骤生成Playwright 文件
.spec.ts - CI/CD集成——用户将脚本放入测试套件,通过运行
npx playwright test
Agent Execution Flow
Agent执行流程
When running a test:
- Load test definition:
node scripts/ui-test.js get "<name>" - Start clawd browser:
browser action=start profile=clawd - Navigate to the test URL
- For each plain English step:
a. Interpret what the user means (click, type, assert, wait, etc.)
b. Use to see the page c. Use
browser action=snapshotwith the appropriate request (click/type/press/etc.) d. Take a screenshot after each step e. Record what selector/ref was used and whether it passedbrowser action=act - Save run results:
node scripts/ui-test.js save-run "<name>" passed=true/false - Report results to user with pass/fail per step
When exporting to Playwright:
- Load the test definition and most recent successful run
- Map each plain English step to Playwright API calls based on what worked during execution
- Generate a file with proper imports, test structure, and assertions
.spec.ts - Save to the user's project or a specified output path
运行测试时:
- 加载测试定义:
node scripts/ui-test.js get "<name>" - 启动clawd浏览器:
browser action=start profile=clawd - 导航至测试URL
- 针对每个自然语言步骤:
a. 解析用户意图(点击、输入、断言、等待等)
b. 使用查看页面状态 c. 使用
browser action=snapshot执行对应操作(点击/输入/按键等) d. 每步执行后截图 e. 记录所使用的选择器/引用以及步骤是否通过browser action=act - 保存运行结果:
node scripts/ui-test.js save-run "<name>" passed=true/false - 向用户发送结果报告,包含每一步的通过/失败状态
导出为Playwright脚本时:
- 加载测试定义和最近一次成功运行的记录
- 根据执行时验证有效的操作,将每个自然语言步骤映射为Playwright API调用
- 生成包含正确导入语句、测试结构和断言的文件
.spec.ts - 保存至用户指定项目路径或默认路径
Step Interpretation Guide
步骤解析指南
The agent should interpret plain English steps like:
| User says | Browser action | Playwright equivalent |
|---|---|---|
| "click the Sign In button" | | |
| "type hello@test.com in the email field" | | |
| "verify the dashboard shows Welcome" | | |
| "wait for the page to load" | | |
| "click the hamburger menu" | | |
| "scroll down" | | |
| "check the Remember Me checkbox" | | |
| "select 'USD' from the currency dropdown" | | |
| "take a screenshot" | | |
| "verify URL contains /dashboard" | check current URL | |
Agent会将自然语言步骤解析为对应操作,示例如下:
| 用户表述 | 浏览器操作 | Playwright 对应代码 |
|---|---|---|
| "点击登录按钮" | | |
| "在邮箱输入框中输入hello@test.com" | | |
| "验证仪表盘显示Welcome" | | |
| "等待页面加载完成" | | |
| "点击汉堡菜单" | | |
| "向下滚动页面" | | |
| "勾选记住我复选框" | | |
| "从货币下拉菜单中选择'USD'" | | |
| "截取当前页面截图" | | |
| "验证URL包含/dashboard" | 检查当前URL | |
Commands
命令列表
Run via:
node ~/workspace/skills/ui-test/scripts/ui-test.js <command>| Command | Description |
|---|---|
| Create a new test |
| Add a plain English step |
| Replace all steps |
| Set the test URL |
| Show test definition |
| List all tests |
| Delete a test |
| Save execution results |
| Show run history |
| Export as Playwright script |
运行方式:
node ~/workspace/skills/ui-test/scripts/ui-test.js <command>| 命令 | 描述 |
|---|---|
| 创建新测试 |
| 添加自然语言测试步骤 |
| 替换所有测试步骤 |
| 设置测试目标URL |
| 查看测试定义 |
| 列出所有测试 |
| 删除指定测试 |
| 保存测试执行结果 |
| 查看测试运行历史 |
| 导出为Playwright脚本 |
Export Format
导出格式
Generated Playwright files include:
- Proper TypeScript imports
- block with test name
test.describe - with navigation to base URL
test.beforeEach - Each step as a sequential action with comments showing the original English
- Assertions where the user said "verify", "check", "should", "expect"
- Screenshots on failure
生成的Playwright文件包含:
- 标准TypeScript导入语句
- 带测试名称的代码块
test.describe - 导航至基础URL的钩子
test.beforeEach - 每个步骤作为顺序执行的动作,并附带注释显示原始自然语言描述
- 当用户使用“验证”“检查”“应该”“期望”等表述时自动添加断言
- 执行失败时自动截图
Screenshots & Video
截图与视频
During test execution, the agent should:
- Before each step: take a screenshot → save as
step-NN-before.jpg - After each step: take a screenshot → save as
step-NN-after.jpg - On failure: take a screenshot → save as
step-NN-FAIL.jpg
Screenshots are saved to:
~/.ui-tests/runs/<slug>-<timestamp>/After the run completes, generate a walkthrough video:
bash
ffmpeg -framerate 1 -pattern_type glob -i '~/.ui-tests/runs/<folder>/step-*.jpg' \
  -vf "scale=1280:-2" -c:v libx264 -pix_fmt yuv420p -y output.mp4
Then send the video to the chat.
测试执行过程中,Agent会:
- 每步执行前:截取页面截图 → 保存为
step-NN-before.jpg - 每步执行后:截取页面截图 → 保存为
step-NN-after.jpg - 执行失败时:截取页面截图 → 保存为
step-NN-FAIL.jpg
截图保存路径:
~/.ui-tests/runs/<slug>-<timestamp>/测试运行完成后,生成演示视频:
bash
ffmpeg -framerate 1 -pattern_type glob -i '~/.ui-tests/runs/<folder>/step-*.jpg' \
  -vf "scale=1280:-2" -c:v libx264 -pix_fmt yuv420p -y output.mp4
随后将视频发送至聊天窗口。
Storage
存储路径
- Test definitions:
~/.ui-tests/<slug>.json - Run history:
~/.ui-tests/runs/<slug>-<timestamp>/run.json - Screenshots:
~/.ui-tests/runs/<slug>-<timestamp>/step-*.jpg - Video:
~/.ui-tests/runs/<slug>-<timestamp>/walkthrough.mp4 - Exported scripts: user-specified path or
./tests/<slug>.spec.ts
- 测试定义:
~/.ui-tests/<slug>.json - 运行历史:
~/.ui-tests/runs/<slug>-<timestamp>/run.json - 截图文件:
~/.ui-tests/runs/<slug>-<timestamp>/step-*.jpg - 演示视频:
~/.ui-tests/runs/<slug>-<timestamp>/walkthrough.mp4 - 导出脚本:用户指定路径或默认
./tests/<slug>.spec.ts